Working with views.
Workspace area in ZModeler is split to views, so you can observe the scene from
different angles. Views can be divided to Perspective and Orthographic
views by type of showing geometry.

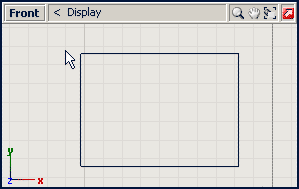
Orthographic view (the left one) shows geometry without perspective - this type of
view is used to display scene exactly from top (bottom), side and front (back) - these are
views used for modelling. Perspective view (the right one) shows geometry with
perspective. This kind of view is more comfortable to viewing geometry from different
points but is rarely used when modelling.
In previouse step you have created the box. Views controls will be explained now
so you can easilty observe the scene. Each view has the following controls:

- Viewport type button. You can press it to change type of according view.
- Viewport menu. It contains configuration options for the view.
- Zoom tool.
- Pan/Scroll tool.
- Fit tool. By pressing this button, view will adjust zoom and scroll to fit scene content.
- Maximize/Restore button.
- Pivot helper. This is a helper point used when modelling. You can drag it with left mouse button at any time.
- Axes tripod - shows direction of world axes. Bold axis letter means axis points to the viewer, axis line fades to gray if axis points away from viewer.
To see a closer view of the box, you need to zoom in; by zooming out an opposide
operation performed - viewer moves away from objects. Zooming usually peformed by
scrolling mouse wheel up/down:


This is an embedded zooming feature. Note, you can hold Shift key down to zoom faster
and Ctrl to zoom slower. If you have mouse without scroll wheel, you can use
additional zooming features:
 +
+ ... and drag
mouse up/down. And of cause 3. Zoom tool can be used. It zooms-in with left
mouse click and zooms-out with right mouse click. The main benefit of zoom tool -
it allows to zoom certain area as simple as dragging a desired zoom-area rectangle
with left mouse button held down.
To scroll the view simply press  middle mouse button
(mouse wheel) and drag the mouse. Middle mouse button (mouse wheel) is not used by
any modelling tools, so these "middle-button" Zoom and Scroll features are always
in your hand. If you have mouse without middle button - you can alternatively press
 both left and right buttons and drag the mouse. There
is a major disadvantage of this uproach - both left and right buttons are used by
modelling tools and ZModeler might consider pressing left and right mouse buttons
as a command to perform some action. For example, if Delete tool is active,
you can delete something in scene. To avoid this, either use 4. Pan tool or
take as a habit to hold
  key when navigating in
viewport. None of tools works when Alt key is held down - only view is controlled.
Now take a look at Perspective view.

Zooming and scrolling in this view works exactly as in all other views. At least one
more navigation you should be familiar with: you should be able to view from different
angles:


Hold Alt key, left mouse button and drag mouse up/down, left/right. You will change
viewer position and can view from different angles. The point viewer looks at will
remain the same. You can scroll view (change the point you look at), zoom and change
viewing point to achieve position when view displays exactly what you need.
Holding Alt key while navigating in view is a good habit - take it as advice. Even when navigating in 3D view (Same as Perspective view, but you can not edit meshes there) - it's not neccessary to hold Alt key in this view, but I recommend to do so. Just to keep it as a habit.