Modelling vehicle's side.

Whe have a left-side blueprint and will start from modelling this side of the car. I've highlighted the this area on the front image. Also notice that I moved Pivot Helper to this area. This is where all points will appear (in "Front" view) while we shall create shape in "Left" view.
Now, in Left view (from this point on we shall model in Left view only, unless
otherwise specified, so you can maximize it) create a Grid surface. It
can be any size with any amount of rows and columns - we shall remodel most of
this grid. I've created default 2x2 quad-based grid. Switched it to vertices
level and shaped what could be made of it in the area of side doors:
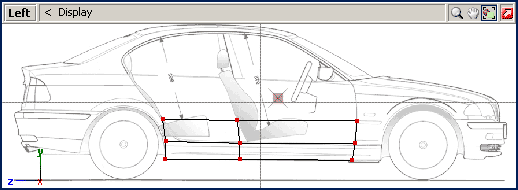
Now fire up Create\Polygon\Strip tool - this will be the only tool we
shall use currently. Currently I recommend to set it options to "Triangles" and
disable smart depth. Create a strip of polygons leading to the right (to
front wheel well). And then draw a strip of polygons at top: leading to side
glasses (or upto a side line which is drawn on the blueprint)

Notice that I try to lay vertices on blueprint lines. I've drawn pink shaping
lines over blueprint and a shape to show what exactly I try to follow, or what
blueprint leads me to. The next image shows some more polygons created with
respect to lines drawn above:

Don't be afraid to place polygons improperly. You can always cancel creation of polygons strip by right-clicking. If things go even worse, you can switch to polygons (or vertices) level and delete polygons (or vertices) that you've placed improperly. Make sure polygons do not overlap (their edges do not cross each other). Finally, if certain vertex was created a bit out of place, leave it as is, since we shall move some of them more accurately with move tool.
When you get used to Strip creation tool, there will be almost no mistakes and you will create polygons quite rapidly. Also, I recommend to use mouse wheel to zoom in and out while creating polygons.
Now we shall create an arc above front wheel well. This arc pumps out of the
side shape of the car as it's shown on the image. So, this have to be created
with a set of polygons as shown. Vertices closer to the arc will pump out, and
vertices away from arc will lay on the same shape of car's side. Create an
according strip of polygons.

Notice that in some areas I've created vertices with new polygons that do not reside on previousely created vertices. This is the case, when I placed previouse vertices out of place. Don't be afraid to place new polygons where you need them, but not where you already have vertices. In general, this can be resolved by moving old vertices and merging them with new, or by deleting old vertices and remodelling an area with respect to new (properly-placed) vertices.
Like on the image on the right, you might face to improperly placed vertices
earlier. In both cases (rounded with blue color) I prefer to move old vertices
where they actually needed to be and merge them with new vertices using
Modify\Submesh\Weld tool. Before creating any new polygons, make sure to
resolve all such a cases in your mesh, or you can simply lead to a very messy
shape. If you can't - just delete vertices you don't like and remodel the area.

Create the rest of polygons in near front wheel well, but don't go to far to
front (don't model headlight). Image below shows what you sould come up to:

If you experience any troubles, you can open an according .z3d file which are supplied with these lessons. The one on the image above is in Files\les3_01.z3d file. You can examine how mesh is modelled, delete some polygons and recreate them manually. Then delete few more polygons and/or vertices and create them again. When you get used how this all was modelled, you can either revert to your own modelled shape, or continue with the files I supply.
Shaping flat side to 3D mesh.

Take a look into "Front" view. You will see that all vertices we have created are placed into one straight line which is exactly where Pivot was placed. Evenmore, you can spin "Perspective" view and see that we have created a flat side shape and nothing more. We shall now shape this flat side to a 3D mesh with a so-called "vertices extrusion" method.
Don't be misleaded by the method name to "Extrude" tool. This name has some historical reasons under, and has nothing to do with Extrude tool. I personally would call the method we shall use a vertices push/pull method due to the actual operations we shall use.
First of all, switch an object you have shaped to Flat shaded mode (switch to objetcs level, right-click on an object, pick "Properties" and check "Flat Shaded" in "Rendering\Technique" branch).
Pick Modify\Move tool, switch to Vertices level, pick Screen Z axes mode you are ready to push/pull vertices. We shall work in "Left" view but will be looking for changes in the "Front" view. Highlight the rightmost vertex and drag mouse up/down. You will see in front view how it will move - place this vertex where it should be (we have a font blueprint, vertex lays on the line which is drawn on both side and front blueprints, so you can drag it untill it reaches according line. Take a look at the image on the right.
Image on the right shows how other vertices should be laid. The vertices on
the green line (in left view) should lay on a green line (in front view); Same
to the vertices on the blue lines. Finally, you should come to something like
this:

There might be some difficulties with positioning the vertices wich lay on a
"surface" but not on the lines drawn on blueprint. Here you should pay attention
to result shape. Flatshade mode here does it's helpful trick. I've hidden rear
vertices while pushing/pulling front area. This is a good habit to hide the
stuff that you don't currently need.
Using creation and extrusion technique above, I've modelled some polygons on the rear part and finally came to complete side shape of the car. You can view Files\les3_02.z3d file. Here we came to the one of the most important steps.
Shape accuracy.
I'm almost sure that mesh was created inacurately, and can be improved with
dozen of small vertices repositionings. With a Move tool in Screen
XY mode in a very close zoom, you can position vertices properly in side
and in other views. Always pay attention to perspective view, since you might
notice that certain shape curves are not that accurate or shape is distorted.
Most of car's shape based on curves. If you represent a curve in side view
(place a vertices on a curve) these vertices will form a curve in other views.
 So, for example, if vertices are laid accurately in side view, and they form a
zig-zag line in front view, then vertices push-pulled improperly (some
of them should be moved to shape a curve).
So, for example, if vertices are laid accurately in side view, and they form a
zig-zag line in front view, then vertices push-pulled improperly (some
of them should be moved to shape a curve).
The second step you should perform is to flip some edges that obviousely should be flipped. While creating the shape with strips of triangles - certain triangles were laid in more comfortable way, but this does not mean that these triangles are laid properly. Image on the right shows a pair of such an edges. You should flip an edges with Modify\Flip tool. The main strategy in finding an edges for flip is in following:
The last step in shape accuracy is to check whether everything is properly
modelled. Of cause we omit certain details, but the main volume of the car
should be followed by the shape your model very closely.

On the image I've drawn a blue line - it shows that i've missed a row of vertices
that really needed to represent curvy shape of BMW's side. The green shadow I've
drawn shows the area that should be pushed into the car, while the area under
this green shadow should pop out from the side's shape. Let's start with the
simplier thing - a row of missing vertices. As you see, the line crosses several
edges, but this does not mean that you'll need to insert a vertex in each
intersection. No! insert as few vertices as possible and insert them only where
you need them.
 Animation on the left shows that only two vertices were inserted to refine
rear area. Evenmore, the first vertex was inserted where I wanted it to be, but
the second was inserted where edge was available. After insertion I flipped some
edges to form better and accurate shape. And finally, I've moved the vertices
to form exactly what I needed.
Animation on the left shows that only two vertices were inserted to refine
rear area. Evenmore, the first vertex was inserted where I wanted it to be, but
the second was inserted where edge was available. After insertion I flipped some
edges to form better and accurate shape. And finally, I've moved the vertices
to form exactly what I needed.
When inserting a vertices, you might come to a very messy shape. Always pay attention to new vertices - don't insert too much. If the mesh comes up too messy, try to flip some edges to make mesh more clean. And don't hurry - think several steps ahead.
The same way I've inserted the vertices in the doors area. Finally, I've shaped
the blue line drawn above by push/pulling newly inserted vertices until I
satisfy with the curved shape of car's side. I added row of vertices, flipped
some edges and faced to eliminate lengthy triangles on car doors.
So, I've added two columns of vertices too. Finally, to make a pushed area
shaded with green color (image above) I've added one more row of vertices and
pushed them into the car. As a result, I've got the following mesh (see an image
on the right). You can also notice that initial 2x2 quad-based grid is no longer
recognizeable - everything was remodelled, refined and shaped.
Here the file: Files\les3_03.z3d.
Shape cleanness.
Even at this point I already suffer from too messy shape. It's quite accurate, but it's not clean. There are lots of lines that makes it hard to edit. The most simple way to clean the mesh is to convert triangles to quads. In well-modelled mesh more than 90% of mesh can be presented in quads. So, switch to edges level and form as much quads out of shape, as possible. But keep in mind that you should make quads only out of triangles that are almost-planar (lies in one plane and shaded with very close level of gray in Flat Shaded mode).
I strongly recommend to use Perspective viewport for such an operations. In this viewport you can spin around a pair of triangles before making a decision whether you actually should convert such a pair into single quad or should leave it as is.
You can start from the doors - usually most of polygons there could be quads.
Image on the right shows what I've done with the shape I've created earlier.
Here the file: Files\les3_04.z3d.
If you face with any sort of problems while following this lesson, I recommend to practice on simplier shapes (place as less polygons as possible). You can also use the files I supply and perform the steps exactly as I do. The aim of this lesson for you is to get used how exactly everything is modelled. The side we have created is the basement of your skill. All other techniques will serve only small aspects of modelling, performing very specifical operations. If you don't like the result you've came to, you can start from scratch, but keep in mind all the mistakes you've made to avoid them. Professional modellers can see way more steps ahead when they model meshes. You should be aimed to this ability too.
You are not restricted in following the steps as they described: first - modelling, then - refining for accurace and then tuning for cleanness. You can perform all these operations simultaneously. So, you can create polygons in a small area, ensure that vertices are laid properly: push/pull them and adjust positions precisely, then make sure polygons formed proper shape, and once you are satisfied with it, convert to quads what worth converting. And then move to next small piece of model. When you'll reach certain modelling level, you can switch Create\Poly\Strip tool to Quads mode and model with quads. In Quads mode you can create triangle, if you interrupt tool with right-click after you have picked three (instead of four required) vertices for the quad.